
Build Your Brand & Attract Your Dream Clients – time to say ‘goodbye’ to boring logos and ‘hello’ to beautiful inspirational branding.
Welcome back to the final Build Your Brand & Attract Your Dream Clients blog in the series, where we say ‘goodbye’ to boring logos and ‘hello’ to beautiful inspirational branding.
Throughout the series we have explored what branding is, and how great branding can attract your dream clients, how companies build strong brands, and how you can do it too.
I hope you’ve enjoyed the recent blog posts, where we talked about what branding is, logos, typography, colour, icons, patterns, photography and social media icons. If you haven’t read these I recommend you go back and check those out.
If you have read these blogs how did you get on with your mood boards and your new brand choices? Are you inspired? I’d love to see some of them so please comment below or post your photos on my Facebook page.
So today is the last blog in the series where we pull together all the elements you have collated and created for your new branding. Today is the day you get to see all that hard work come together to create your new brand! Exciting, isn’t it? This is when you get to see the full-impact of your ideas and how your brand identity works in one complete piece. It’s also the time to refine your ideas and mood board so that you can create your branding guide bible, which will hold all the design information that you or your suppliers might need in the future. It’s a reference guide that should always be at hand.
But first let’s sort out all those ideas and elements you’ve collected together previously.
Sit with your new logo, font choices, colour options, patterns, icons and illustrations, and have a good look at them. Hopefully you’re in love with what you’ve created, but it’s ok if some things aren’t quite sitting comfortably. That’s what the design process is all about. Have a good look at all the elements and make a note of what isn’t quite working, how you can change it or if any elements are just not needed or perhaps missing. If you have commissioned a designer this will form the start of an email to her explaining what you’d like but equally you can go back through these tutorial blogs to re-work any elements.
Ask yourself – ‘Do these pieces, together or individually, sum up my company? Are they adding value or confusing my clients?’ Be honest with yourself, does it really work?
When you have done this it’s time to ask the audience! Ask your most loved and trusted clients, who probably know your company best, what they think. If you’re a new company and don’t have any clients ask only your closest friends. They’ll have your best interests at heart and shouldn’t be afraid to tell you the truth. Try to avoid asking too many people for their advice. In this day and age everyone thinks that they have a design eye and that they can have an opinion. Unfortunately, too many opinions could be confusing. I know I have been confused before by this. All that matters is your opinion and it’s good to have some feedback as long as it’s constructive.
At all times, don’t be disheartened with what you hear. Keep the bits you love and ignore the criticism but keep in mind the constructive comments and see if you can work out a solution. If you need to, head back to your inspiration boards to see if that can solve it and keep in mind what it is you want your company to portray to your dream clients.
Once you’ve been through this stage you’ll have a great idea about your final brand – Now is the time to create your branding guide bible.
A branding guide bible is usually made up of a few pages that describe your brand and it’s separate design elements. It will show the variations of your logo, your font choices, your colour stack, your patterns, icons and illustrations and any photography or social media icons you’ve created, basically everything we have covered in the last 5 blogs. This creates a physical document that you can refer to going forward.
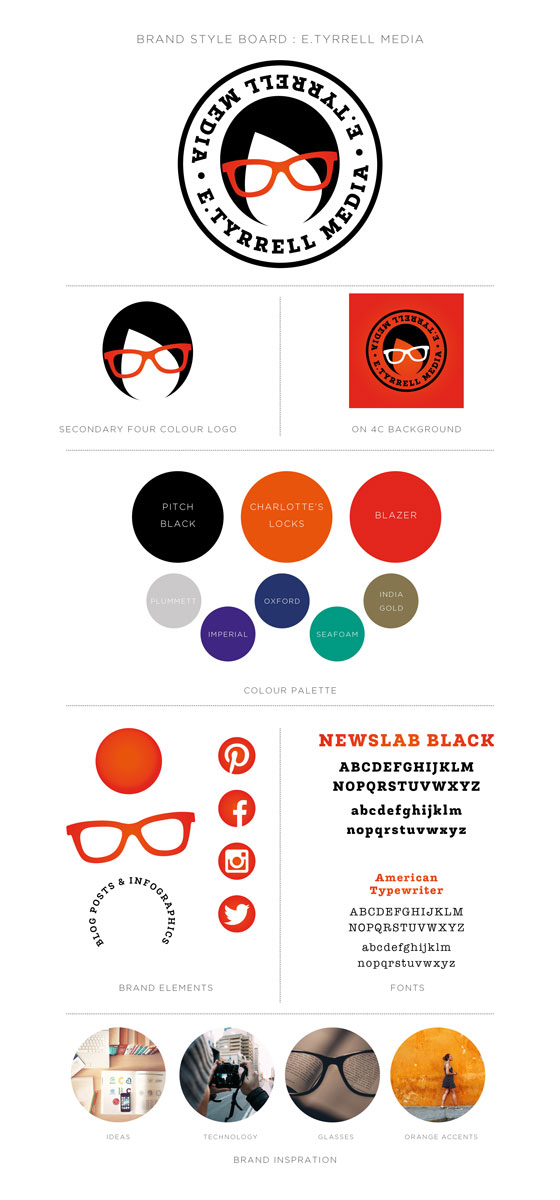
It’s quite crucial to the process. You don’t want to be lost when your new web design software is asking what colours to use, or in six months’ time when you need to add a font to a leaflet design and you can’t remember what it’s called! It’s also great to send to designers when you’re commissioning them for outsourced design. It’s a quick and compact guide so that a new designer can understand your company straight away.
Now, what do you think? Are you completely in love with your new branding? I hope so. It’s still ok to go back and make changes but I recon it looks amazing! Congratulations, you have built your brand. You should be so proud of yourself!
I am so chuffed with what you’ve achieved and I would love to see it all.
If you’d like a special free brand-health check of your new branding guide bible, then email hello@designjessica.co.uk and we would love to see them and offer any advice.
So, that’s it! I hope you’ve enjoyed these first six tutorial blogs about branding. I’d love it if you’d like it or share it with someone else who might find it useful.
If you have any questions about branding post them below and I will be happy to answer them.


Leave A Comment